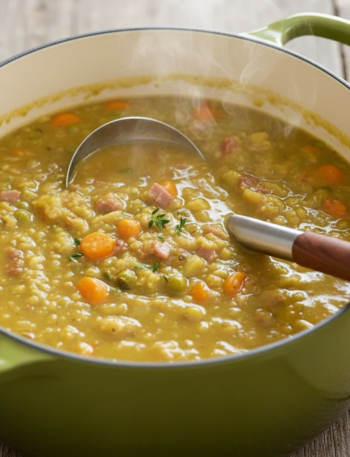
There’s a version of beef vegetable soup that exists in the world of institutional cooking. Pale broth, mushy vegetables, rubbery beef that bounced around a steam table for too long. Most of us have encountered it at some cafeteria or family gathering, and it’s done some real damage to the reputation of what should be one of the most satisfying bowls of food you can put together.
This is not that soup. This beef vegetable soup earns its keep through a few deliberate choices that separate it from the forgettable versions. The meat gets a proper seasoning blend before it ever touches the pan. A quick sear builds a foundation of deep, caramelized flavor. Red wine deglazes all those browned bits stuck to the bottom of the pot, turning what might have been wasted residue into the backbone of your broth. And instead of dumping every vegetable in at the beginning and letting them turn to mush over two hours, the frozen vegetables go in at the very end, staying bright and just-tender when the soup hits the bowl.
Two hours of gentle simmering does the heavy lifting while you go about your day. The result is something that tastes genuinely rich and complex, the kind of soup that makes people ask what you put in it.
Why This One Is Worth Your Time
The Case Against Starch in the Pot
The first thing worth understanding about this recipe is what it doesn’t include, at least not in the pot itself. There are no potatoes, no pasta, no rice, no barley. That might sound like a limitation, but it’s actually what makes this soup so practical. Any time you cook a starch directly into a soup and store the leftovers, you know what happens. The starch soaks up the broth overnight and what was once a beautifully balanced soup becomes a thick, gluey situation by day two.
By keeping the starch on the side, which might be a bowl of mashed potatoes or a couple of warm biscuits, the soup itself freezes and reheats perfectly. Three months in the freezer, and it still comes back exactly as you left it.
The Spice Blend That Sets It Apart
The other thing working in this recipe’s favor is the beef seasoning. Rather than relying on the broth alone to season the meat, you build a spice blend first, brown sugar for a hint of caramelization, black pepper, salt, garlic powder, onion powder, chili powder, and paprika. The sugar in particular does something interesting during the sear. It helps the outside of the beef develop a deeper, richer color faster, and it contributes a barely perceptible sweetness that balances the savory depth of the broth.
Choosing Your Cut of Beef
Chuck Roast: The First Choice
Chuck roast is the gold standard for this kind of long-simmered soup. It has the right balance of fat, connective tissue, and muscle fiber to break down beautifully over two hours of low, gentle heat. The connective tissue converts to gelatin as it cooks, which adds a silky body to the broth that you simply cannot replicate with leaner cuts. If you can only pick one cut, pick chuck.
Other Cuts That Work Well
Rump roast and bottom round are perfectly workable alternatives, more economical and a little leaner. They need that same low, slow heat to reach tenderness, so don’t try to rush them.
Sirloin and tenderloin roasts are on the opposite end of the spectrum: naturally tender cuts that don’t need as much time to cook down. They’re more expensive, but if you happen to have one on hand or want a slightly quicker cooking time, they work well here.
If you’re buying pre-cut stew meat from the grocery store, that’s fine too, though stew meat packaging is often vague about which cut is inside. It’s almost always a tougher cut, which means it benefits from the full two-hour simmer rather than being rushed.
When to Season the Meat
One practical note: season the meat right before you’re ready to sear it, not in advance. Once salt contacts the surface of raw beef, it starts drawing moisture out. Season and sear immediately, and the outside develops a beautiful crust instead of steaming in its own liquid.

Building the Base: Searing, Deglazing, and the Fond
Prepping and Coating the Beef
Cut your beef into roughly one-inch cubes, trimming away any large, tough pieces of fat. The fat marbled through the meat is what you want to keep. Toss the cubes in the seasoning blend first, then coat them in flour. The flour does two things, it helps the exterior brown more evenly during the sear, and it adds a small amount of thickening power to the broth as it cooks.
Getting the Sear Right
Heat olive oil in a large, heavy pot or Dutch oven over medium-high heat. The pan needs to be genuinely hot before the meat goes in. A lukewarm pan produces gray, steamed beef. A properly hot pan produces a sear with some color on it.
Work in batches. Crowding the pan drops the temperature and again, you get steaming rather than searing. Each piece needs about 30 to 40 seconds per side, just enough to develop color. The center should still be red and cold when the batch comes off. It will finish cooking during the long simmer, and if you cook it through during the sear, it can become grainy and tough by the time the soup is done.
Don’t Lose the Fond
After the last batch comes out, turn the heat off and look at the bottom of the pot. You’ll see a layer of darkened, sticky residue. That’s the fond, and it is pure flavor. Wipe away any genuinely black, burned spots if needed, but leave everything else. That’s the foundation of your soup.
Deglazing and Building the Aromatics
Once the pan has cooled slightly, add the wine and bring the heat back up to medium-high. As the liquid hits the pan, use a silicone spatula to scrub the bottom, and watch everything that was stuck dissolve into the wine. This is deglazing, and it’s the step that turns a good soup into a great one. Let the wine reduce by roughly half, which takes about three to five minutes, then add the butter and diced onions. Four minutes for the onions, another minute once the garlic goes in.
A Note on the Wine
Dry red wine works best here. A Cabernet Sauvignon or Merlot both bring enough body and tannins to hold up to the beef without overwhelming the broth. The wine doesn’t need to be expensive, but it should be something you’d actually drink. Avoid anything labeled “cooking wine,” which is loaded with salt.
If you’d prefer not to use wine at all, a combination of beef or chicken broth plus two tablespoons of red wine vinegar is a solid substitute. The acidity in the vinegar does a similar job in terms of cutting through the fat and helping the beef develop flavor.
Beef Vegetable Soup
Ingredients
Equipment
Method
- Mix the Seasoning: Combine brown sugar, pepper, salt, garlic powder, onion powder, chili powder, and paprika in a small bowl and set aside. Measure and prep all remaining ingredients before you begin cooking.
- Cut the beef into roughly one-inch cubes, trimming away large, tough pieces of fat. Marbled fat throughout the meat is fine and should stay. Season the cubes with the spice blend right before cooking, toss to coat, then sprinkle over the flour and toss again.
- Sear the Beef: Heat 3 tablespoons of olive oil in a large pot or Dutch oven over medium-high heat. Working in batches so the pan isn’t crowded, add the beef and sear for 30 to 40 seconds per side until browned on the outside. The center should still be red and cold. Transfer to a plate and add more oil between batches as needed.
- Turn off the heat. Wipe away any truly black burned spots from the bottom of the pan but leave the brown residue (fond) in place.
- Deglaze with Wine: Once the pan has cooled slightly, add the wine and return the heat to medium-high. Use a silicone spatula to scrub the bottom of the pan and dissolve the fond into the liquid. Let it reduce by half, about 3 to 5 minutes.
- Add 2 tablespoons of the butter and the diced onion. Cook for 4 minutes, then add the garlic and cook for 1 more minute. By now the wine should be nearly absorbed and the onions will be soft and reddish.
- Build the Broth: Return the seared beef to the pot along with the tomato paste, Worcestershire sauce, bay leaves, rosemary, ground sage, beef broth, and bouillon. Stir to combine.
- Cover the pot, leaving a small gap for steam to escape, and simmer over medium-low heat for 2 hours. The liquid should bubble gently and reduce slowly.
- Thicken and Finish: When the beef is tender, bring the soup to a full boil. Add the cornstarch and cold water to a small container, seal, and shake until fully combined. Slowly pour the slurry into the boiling soup in increments, stirring constantly, until the soup reaches your desired thickness.
- Reduce the heat to low. Add the frozen vegetables and stir to combine. Cook for 10 minutes until heated through and just tender. Add Gravy Master if a deeper color is desired.
- Remove the bay leaves and rosemary stem. Swirl in the remaining 2 tablespoons of cold butter until fully incorporated. Garnish with chopped parsley and serve immediately over mashed potatoes or alongside biscuits.
- Crock Pot Method: Complete steps 1 through 6 on the stovetop. Transfer the onion and garlic mixture along with all remaining ingredients (except cornstarch mixture and frozen vegetables) to a slow cooker, using only 6 cups of broth. Cook on low for 7 1/2 to 8 hours or high for 3 1/2 to 4 hours. Turn heat to high, stir in the cornstarch slurry, and simmer for 5 minutes. Add frozen vegetables and cook for 15 more minutes. Turn off the heat, remove bay leaves and rosemary, and swirl in the cold butter.
Notes
- Chuck roast is the best all-around choice for this soup. Rump roast and bottom round also work well with the full 2-hour simmer. Sirloin and tenderloin are more tender cuts that require less cooking time.
- Season the beef right before searing, not in advance. Salt draws moisture to the surface of the meat quickly, and you want that surface dry when it hits the hot oil.
For a wine-free version, substitute the red wine with an equal amount of beef or chicken broth plus 2 tablespoons of red wine vinegar. - To add mushrooms, cook them separately in butter over high heat until golden and their liquid has evaporated. Set aside and stir them in only at the very end with the frozen vegetables.
- To add potatoes on the stovetop, simmer the soup for 1.5 hours first, then add diced potatoes. Bring to a boil, reduce to a simmer, and cook for 25 to 30 minutes until fork-tender.
- The cornstarch slurry must go into boiling liquid to thicken properly. Do not skip bringing the soup to a full boil before adding it.
Refrigerate leftovers in an airtight container for up to 3 days, or freeze for up to 3 months. - Make-ahead option: complete the recipe through step 8, refrigerate for up to 2 days, then finish with the slurry and vegetables when ready to serve.
The Long Simmer and What’s Happening in That Pot
Why Low and Slow Matters
Once the seared beef goes back in along with the tomato paste, Worcestershire sauce, bay leaves, rosemary, ground sage, beef broth, and bouillon, the pot gets covered with just a small gap left open for steam to escape. Then it simmers over medium-low heat for two full hours.
This is where the tough connective tissue in the chuck roast does its work. Given enough time and gentle, moist heat, collagen converts to gelatin, and the beef transforms from a tough, chewy cube into something that pulls apart easily and has a silky, giving texture. High heat speeds up the process but produces tougher, drier meat. Low and slow is non-negotiable here.
What the Tomato Paste Is Actually Doing
The tomato paste is worth calling out specifically. Three tablespoons might seem like a lot, but it doesn’t make the soup taste like tomato soup. It contributes umami, depth, and a rich reddish color, and it rounds out the flavors in a way that’s hard to pinpoint but easy to notice when it’s missing. For the best results, let the tomato paste cook into the onion mixture for thirty seconds or so before adding the liquids.
Can You Add Potatoes?
Yes, with a slight adjustment to the timing. If you’re cooking on the stovetop, let the soup go for about an hour and a half before adding diced potatoes. Bring the liquid back to a boil, then reduce to a light simmer for another 25 to 30 minutes, or until the potatoes are fork-tender. If you’re using a slow cooker, potatoes can go in right from the start.
Just keep in mind that potatoes will affect how well the soup stores. Once they’re in, plan to eat it within a day or two rather than freezing it.
Adding Mushrooms
Mushrooms are a wonderful addition, but they need to be handled separately. If you throw raw mushrooms directly into the simmering pot, they release a significant amount of water, which dilutes the broth and gives them a pale, soggy texture.
Instead, cook the mushrooms in a hot pan with a little butter or oil until they’ve released their liquid, that liquid has evaporated, and the mushrooms are golden brown. Pull them out and set them aside. Add them back to the soup only at the very end, after the frozen vegetables have gone in. This way, they keep their color, their meaty texture, and their concentrated flavor.
Finishing the Soup
Thickening with a Cornstarch Slurry
When the two hours are up and the beef is tender, bring the soup to a full boil before adding the cornstarch slurry. The slurry is just equal parts cornstarch and cold water, shaken together until smooth. The reason it needs to go into boiling liquid is that cornstarch won’t thicken properly in anything below a full boil. Add it gradually, stirring as you go, and stop when the soup reaches the thickness you’re after.
Adding the Vegetables at the Right Moment
Reduce the heat back to low and add the frozen vegetables, a mix of peas, carrots, corn, and green beans works beautifully here. Ten minutes is all they need. They should be heated through and just tender, not soft and falling apart.
The Final Butter Finish
Before serving, pull out the bay leaves and the rosemary stem. Then comes one final step that makes a noticeable difference, swirl in two tablespoons of cold butter. This technique, which French cooks call monter au beurre, gives the broth a smoother, more velvety finish. The cold butter emulsifies into the hot liquid rather than simply melting on top, which is why it needs to come straight from the fridge.
Slow Cooker Method
The approach is the same through step eight, meaning you still sear the beef and deglaze the pan on the stovetop. Transfer everything to the slow cooker, reduce the broth to six cups rather than seven to account for less evaporation, and cook on low for seven and a half to eight hours, or high for three and a half to four hours. The cornstarch slurry goes in at the end with the heat turned to high, followed by the frozen vegetables.
Storage and Make-Ahead Notes
Refrigerating and Freezing
The soup keeps well in an airtight container in the refrigerator for up to three days. For longer storage, freeze it for up to three months. Because there are no starches in the pot, it reheats from frozen without any of the texture issues you’d normally worry about.
Getting Ahead on the Recipe
If you want to get ahead on this recipe, you can complete all the steps through adding the broth and seasonings, then refrigerate everything for up to two days before finishing. This actually works in your favor, the flavors deepen overnight, and the soup is arguably better on day two than day one.
What to Serve Alongside
Serve it alongside a mound of creamy mashed potatoes, a stack of warm biscuits, or a piece of thick, cheesy garlic bread. The soup is complete on its own, but a good starch alongside it turns dinner into something worth sitting down for.

Hi, I’m Josie Erin. At TheRecipeBites, I turn simple, everyday ingredients into flavorful bites that make every meal memorable. I believe great food doesn’t have to be complicated it just needs the right balance of flavor, creativity, and love. From quick weeknight dinners to sweet treats worth sharing, I’m here to help you cook with confidence and enjoy every bite.