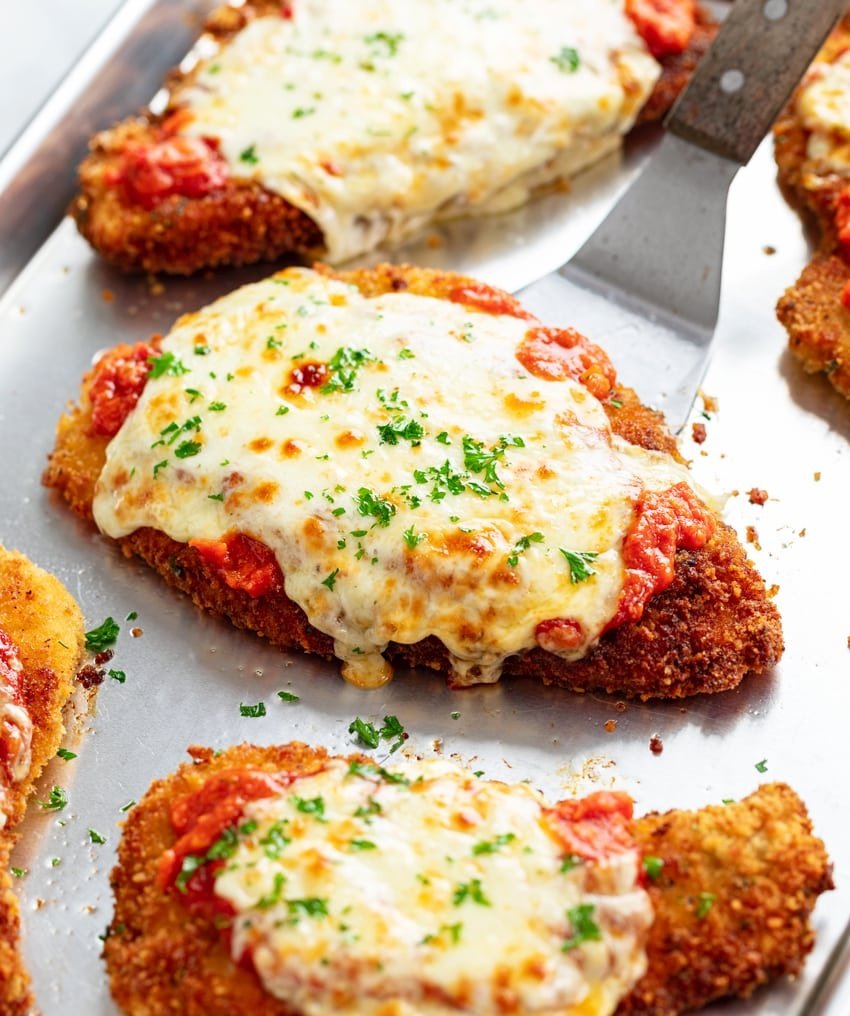
Chicken Parmesan, often affectionately known as Chicken Parm, stands as a beloved icon of Italian-American cuisine. This dish, a harmonious blend of crispy fried chicken cutlets, rich marinara sauce, and melted mozzarella and Parmesan cheeses, offers a symphony of textures and flavors that has captivated diners for generations. While its name suggests a purely Italian origin, the Chicken Parmesan we know today is largely an American innovation, a delicious evolution from its Italian predecessor, Melanzane alla Parmigiana, which features eggplant instead of chicken.
The allure of a perfectly executed Chicken Parmesan lies in its contrasts: the satisfying crunch of the breading, the tender and juicy chicken within, the tangy sweetness of the tomato sauce, and the creamy, savory embrace of the melted cheeses. Achieving this culinary balance at home can sometimes be a challenge, with common pitfalls including soggy breading, dry chicken, or an imbalance of flavors. However, by understanding and applying a few key techniques and principles, home cooks can elevate their Chicken Parmesan to restaurant-quality standards, ensuring every bite is a testament to this dish’s enduring appeal.
This comprehensive guide will delve into the nuances of preparing an exceptional Chicken Parmesan. We will explore the historical context of the dish, meticulously detail each step of the cooking process, from selecting the finest ingredients to mastering the art of breading and achieving that coveted crispy finish. Furthermore, we will provide invaluable tips for success, discuss common variations, and offer thoughtful serving suggestions to complete your Italian-American feast. Our goal is to empower you with the knowledge and confidence to create a Chicken Parmesan that is not only delicious but also consistently crispy and deeply satisfying.
A Brief History of Chicken Parmesan
The story of Chicken Parmesan is a fascinating journey that bridges continents and culinary traditions. Its direct ancestor, Melanzane alla Parmigiana, or eggplant Parmesan, hails from Southern Italy, particularly regions like Campania and Sicily. This traditional dish layers fried eggplant slices with tomato sauce, basil, and cheese, then bakes it until bubbly and golden. The term “Parmigiana” itself likely refers to Parma, a city famous for its Parmesan cheese, or possibly to the layering technique reminiscent of Venetian blinds, known as “parmiciana” in some dialects.
When Italian immigrants arrived in America in the late 19th and early 20th centuries, they brought with them their rich culinary heritage. Faced with new ingredients and adapting to a different food landscape, they began to innovate. Chicken, being more readily available and often more affordable than veal (which was used in similar dishes like Veal Parmigiana), became a popular substitute for eggplant. The first documented recipes for Chicken Parmesan began appearing in American newspapers and cookbooks in the mid-20th century, solidifying its place as a distinct Italian-American creation rather than a direct import from Italy.
Over the decades, Chicken Parmesan evolved, becoming a staple in Italian-American restaurants and homes across the United States. Its popularity soared, transforming it from a humble immigrant dish into a beloved classic. Today, it is a testament to the dynamic nature of cuisine, showcasing how traditions adapt and flourish in new environments, creating dishes that are both familiar and uniquely their own.
Essential Ingredients for Culinary Excellence
The foundation of any truly memorable dish lies in the quality of its ingredients. For Chicken Parmesan, selecting fresh, high-quality components is paramount to achieving a rich flavor profile and perfect texture. While the recipe is relatively simple, attention to detail in ingredient selection will significantly impact the final outcome.
#
For the Chicken Base
- **2 large boneless, skinless chicken breasts (approximately 1 pound total):** Opt for fresh, plump chicken breasts. If they are particularly thick, you will need to butterfly them or slice them horizontally to create thinner cutlets before pounding. This ensures even cooking and a larger surface area for breading.
- **Kosher salt and freshly cracked black pepper:** These fundamental seasonings are crucial for enhancing the natural flavor of the chicken. Season generously, as the breading and sauce will also contribute to the overall taste.
- **Neutral oil for frying (such as vegetable, canola, or grapeseed oil):** A neutral oil with a high smoke point is essential for pan-frying the chicken. Avoid olive oil for frying, as its lower smoke point can lead to burning and an unpleasant flavor. You will need enough oil to create about a quarter inch depth in your skillet.
The Three-Stage Breading Station
This classic breading method ensures a crisp, flavorful crust that adheres beautifully to the chicken.
- **Stage 1 (Flour):**
- **½ cup all-purpose flour:** Provides the initial dry layer for the egg to adhere to. It helps create a robust crust.
- **1 ½ teaspoons seasoned salt:** Adds an extra layer of flavor to the flour, complementing the chicken.
- **¼ teaspoon black pepper:** A touch of pepper enhances the savory notes.
- **Stage 2 (Egg):**
- **2 large eggs, beaten until very frothy:** The frothy texture of the eggs is key. Beating them vigorously incorporates air, making the egg wash lighter and allowing it to adhere more effectively to the flour, which in turn helps the breadcrumbs stick without becoming overly thick or gummy. A light coating is desired.
- **½ teaspoon garlic powder:** Infuses a subtle garlic flavor directly into the chicken, enhancing the overall savory profile.
- **Stage 3 (Crunch):**
- **1 ½ cups Panko breadcrumbs:** Panko, a Japanese-style breadcrumb, is renowned for its light, airy, and exceptionally crispy texture. It creates a superior crunch compared to traditional breadcrumbs.
- **1/3 cup freshly grated Parmesan cheese:** Freshly grated Parmesan offers a sharper, nuttier flavor and melts beautifully into the breading, contributing to both taste and crispness. Pre-grated cheese often contains anti-caking agents that can affect texture.
- **1 teaspoon dried parsley:** Adds a touch of herbaceousness and visual appeal.
- **1 teaspoon dried oregano:** A classic Italian herb that provides a warm, aromatic depth to the breading.
#
The Finishing Touches
These components bring the dish together, adding moisture, richness, and that iconic cheesy topping.
- **1 cup of your favorite marinara sauce:** Whether homemade or store-bought, choose a marinara sauce with a robust tomato flavor. A thicker sauce is generally preferred to prevent the breading from becoming too soggy.
- **1 ½ cups shredded mozzarella cheese (low-moisture works best for melting):** Low-moisture mozzarella melts smoothly and evenly without releasing excessive water, which could otherwise make the chicken soggy. Shredding it yourself from a block is always recommended for superior melt and flavor compared to pre-shredded varieties.
- **Fresh parsley or basil for garnish:** A sprinkle of fresh herbs at the end adds a vibrant color, a fresh aroma, and a burst of flavor that brightens the entire dish.
Preparation and Pounding: The Foundation of Tenderness and Even Cooking
The journey to a perfect Chicken Parmesan begins with meticulous preparation of the chicken itself. The goal is to achieve cutlets of uniform thickness, which is crucial for ensuring they cook evenly and remain tender and juicy throughout the process. Unevenly thick chicken can lead to dry edges or undercooked centers, compromising the entire dish.
Start by preparing your chicken breasts. If they are particularly thick, you will need to slice them horizontally. Lay a chicken breast flat on a cutting board. Carefully place your hand flat on top of the breast and, using a sharp knife, slice through the middle horizontally, creating two thinner cutlets. Repeat this process for the second chicken breast. Alternatively, if your chicken breasts are already relatively thin, you might only need to butterfly them, cutting almost all the way through horizontally and opening them like a book.
Once you have your thinner cutlets, the next step is pounding. Place each chicken cutlet between two sheets of plastic wrap or inside a heavy-duty freezer bag. This prevents the chicken from tearing and keeps your workspace clean. Using the flat side of a meat mallet or a heavy rolling pin, gently but firmly pound the chicken until it reaches a consistent thickness of about half an inch. The aim is not to obliterate the chicken but to tenderize it and ensure an even cooking surface. This step is vital; thinner chicken cooks faster and more evenly, resulting in a more tender final product and a better ratio of crispy breading to meat.
After pounding, remove the chicken from the plastic wrap and pat both sides thoroughly dry with paper towels. Removing excess moisture is critical for achieving a crispy breading, as moisture creates steam, which can lead to a soggy crust. Finally, season both sides of the dried chicken cutlets generously with kosher salt and freshly cracked black pepper. This initial seasoning penetrates the meat, building a flavorful base before the breading is applied.
Mastering the Breading Process: Achieving the Perfect Crisp
The breading is arguably the most defining characteristic of a truly great Chicken Parmesan. A well-executed breading provides that irresistible crunch and forms a protective layer that keeps the chicken moist. The classic three-stage breading method is essential here, ensuring maximum adhesion and crispness.
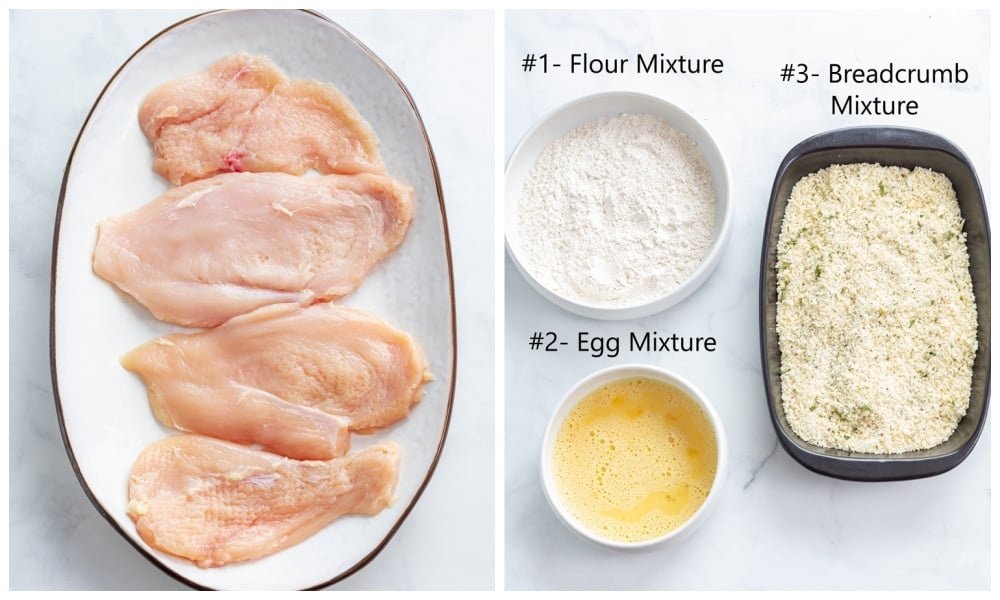
Before you begin breading, set up your workstation efficiently. You will need three shallow dishes or plates, arranged in a logical sequence. In the first dish, combine the all-purpose flour with the seasoned salt and black pepper. Whisk these dry ingredients together until well combined. In the second dish, crack the two large eggs and add the garlic powder. Beat the eggs vigorously with a fork or whisk until they are very frothy and light. This aeration is crucial, as it creates a lighter egg wash that helps the breadcrumbs adhere without becoming too thick or gummy. In the third dish, combine the Panko breadcrumbs, freshly grated Parmesan cheese, dried parsley, and dried oregano. Mix these ingredients thoroughly to ensure an even distribution of flavor.
Now, begin the breading process with your seasoned chicken cutlets. Take one cutlet and dredge it completely in the flour mixture, ensuring every surface is coated. Gently shake off any excess flour. The flour provides a dry surface for the egg wash to cling to. Next, transfer the floured chicken to the frothy egg mixture. Dip it thoroughly, then lift it, allowing any excess egg to drip back into the dish. You want a thin, even coating of egg, just enough to make the breadcrumbs stick. Too much egg can lead to a soggy layer between the chicken and the breading. Finally, place the egg-coated chicken into the Panko and Parmesan mixture. Press the breadcrumbs firmly onto both sides of the chicken, ensuring a thick, even layer. The Panko breadcrumbs are key to achieving that superior crispness, while the Parmesan cheese adds a savory depth and helps create a golden-brown crust. Repeat this process for all chicken cutlets, placing the breaded chicken on a clean plate or baking sheet as you go.
Frying and Baking for Maximum Crispness: A Two-Step Approach
One of the most common complaints about homemade Chicken Parmesan is a soggy breading. This issue often arises from cooking the chicken entirely in sauce or not properly crisping the breading beforehand. Our method employs a two-step cooking process: an initial pan-fry to develop a golden, crispy crust, followed by a high-heat bake to cook the chicken through and melt the cheese, all while preserving that coveted crunch.
To begin the frying stage, heat about a quarter inch of neutral oil in a large, heavy-bottomed skillet over medium-high heat. The oil is ready when it shimmers and a small sprinkle of flour sizzles immediately upon contact. Carefully place the breaded chicken cutlets into the hot oil, ensuring not to overcrowd the pan. Cook in batches if necessary to maintain the oil temperature and allow for even browning. Fry each side for approximately three to four minutes, or until the crust is a rich, golden brown and wonderfully crispy. The goal here is to create a beautiful exterior, not to cook the chicken through completely.
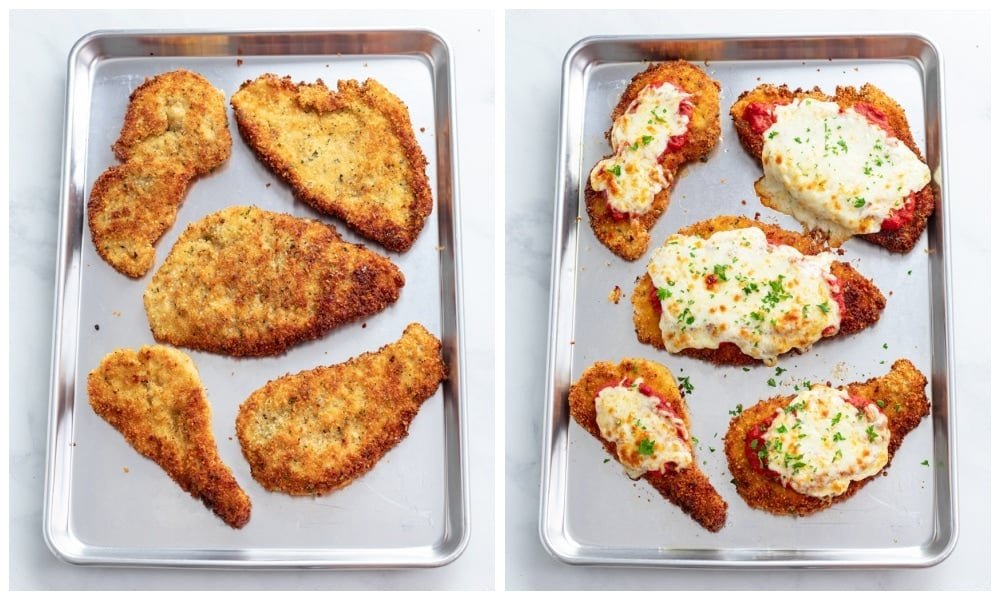
Once golden and crispy, carefully remove the chicken cutlets from the skillet using tongs or a slotted spatula. Transfer them to a wire rack set over a baking sheet. This crucial step allows any excess oil to drain away and prevents the bottom of the chicken from steaming and becoming soggy while you prepare the remaining pieces. It also maintains air circulation around the breading, preserving its crisp texture.
Now, for the baking stage. Arrange the pan-fried chicken cutlets on a light-colored baking sheet. A light-colored sheet is preferred as dark sheets can absorb more heat and potentially overcook the bottom of the chicken. Spoon a modest amount of your favorite marinara sauce over the center of each chicken piece, being careful to leave the crispy edges exposed. This strategic application of sauce helps prevent the breading from becoming saturated and maintains its crunch. Generously top each sauced cutlet with the shredded mozzarella cheese. The amount of cheese can be adjusted to your preference, but a good covering ensures a rich, bubbly topping.
Transfer the baking sheet to your preheated oven and bake at 425°F (220°C) for approximately 12 minutes. During this time, the chicken will finish cooking through, the sauce will warm, and the mozzarella will melt into a glorious, gooey blanket. For an extra golden-brown and slightly bubbly cheese topping, you can carefully switch your oven to the broiler setting for the final 60 seconds. Watch it very closely during this broiling period, as cheese can go from perfectly golden to burnt in a matter of seconds.
Serving Suggestions: Completing Your Italian-American Feast
The moment your Crispy Chicken Parmesan emerges from the oven, bubbling and fragrant, is a truly rewarding experience. To fully appreciate its flavors and textures, it is best served immediately, while the cheese is still molten and the breading retains its peak crispness.
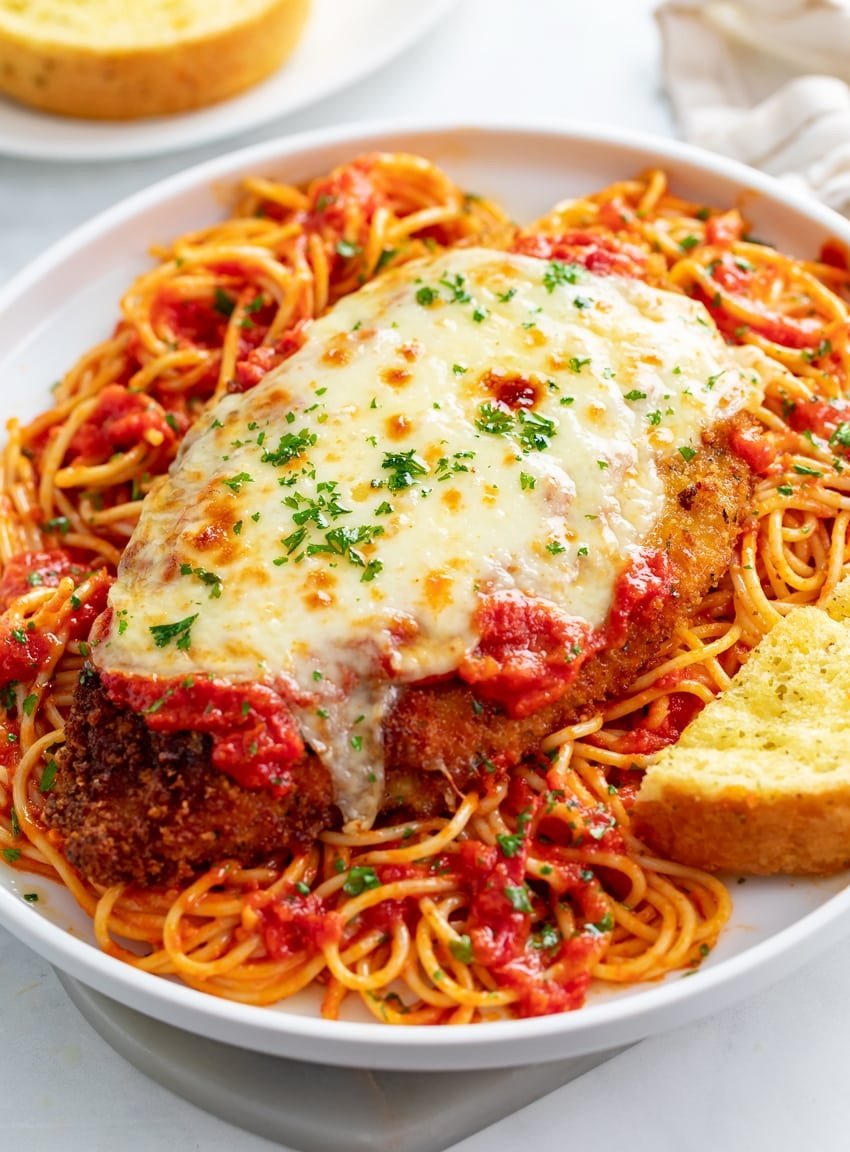
The classic accompaniment for Chicken Parmesan is a generous serving of al dente spaghetti or your preferred pasta, lightly tossed in additional marinara sauce. The pasta provides a comforting base that beautifully complements the richness of the chicken and cheese. For a truly authentic Italian-American dining experience, consider adding a side of warm, crusty garlic bread. The savory garlic and butter of the bread offer a delightful counterpoint to the main dish and are perfect for soaking up any extra sauce.
To balance the meal and add a touch of freshness, a simple, crisp green salad with a light vinaigrette is an excellent choice. The acidity of the dressing cuts through the richness of the Parmesan, cleansing the palate and adding a refreshing element. Finally, before serving, garnish each plate with a sprinkle of fresh parsley or basil. These fresh herbs not only add a vibrant pop of color but also contribute a fragrant aroma and a burst of fresh, herbaceous flavor that brightens the entire dish.
Tips for Success and Common Pitfalls to Avoid
Even with a detailed recipe, a few expert tips can make all the difference in transforming a good dish into a truly exceptional one. Here are some insights to help you achieve Chicken Parmesan perfection every time:
- **Pound the Chicken Thin and Evenly:** This cannot be overstressed. Uniform thickness ensures even cooking and prevents the chicken from drying out. It also creates a larger surface area for the crispy breading, which is the star of the show. Aim for about half an inch.
- **Pat Chicken Dry:** Before seasoning and breading, ensure your chicken cutlets are thoroughly dry. Moisture is the enemy of crispiness. Use paper towels to absorb as much surface liquid as possible.
- **Frothy Egg Wash:** Beating the eggs until frothy incorporates air, making the egg wash lighter and more effective. This helps the breadcrumbs adhere better without creating a thick, gummy layer.
- **Use Panko Breadcrumbs:** While traditional breadcrumbs work, Panko breadcrumbs provide a significantly crispier and lighter texture. They are a game-changer for this dish.
- **Freshly Grated Cheeses:** Whenever possible, grate your own Parmesan and mozzarella from blocks. Pre-shredded cheeses often contain anti-caking agents that can affect their melting quality and flavor. Freshly grated cheese melts more smoothly and tastes superior.
- **Don’t Overcrowd the Pan:** When pan-frying, cook the chicken in batches if necessary. Overcrowding the pan lowers the oil temperature, leading to steamed rather than crispy chicken. Give each cutlet enough space to brown properly.
- **Maintain Oil Temperature:** Keep a close eye on your oil temperature during frying. If it gets too hot, the breading will burn before the chicken has a chance to crisp. If it’s too cool, the chicken will absorb too much oil and become greasy. Adjust the heat as needed.
- **Wire Rack is Your Friend:** After frying, always transfer the chicken to a wire rack set over a baking sheet. This allows air to circulate around the entire cutlet, preventing the bottom from becoming soggy while you fry subsequent batches.
- **Strategic Sauce Application:** When adding marinara before baking, spoon it primarily over the center of the chicken, leaving a border of crispy breading exposed. This helps maintain the crunch around the edges.
- **Watch the Broiler Closely:** If you choose to broil for the final minute, do not walk away from the oven. Cheese can burn very quickly under the broiler. A golden, bubbly top is the goal, not a charred one.
- **Internal Temperature:** Always ensure the chicken reaches an internal temperature of 165°F (74°C) for food safety. A meat thermometer is an invaluable tool for this.
Crispy Chicken Parmesan
A restaurant-quality Italian classic with a shatteringly crisp crust and gooey melted cheese
Ingredients
- Chicken Base:
- 2 large boneless, skinless chicken breasts (approximately 1 pound)
- Kosher salt and freshly cracked black pepper
- 1/4 cup neutral oil for frying
- Breading Station:
- 1/2 cup all-purpose flour
- 1 1/2 teaspoons seasoned salt
- 2 large eggs, beaten until frothy
- 1 1/2 cups Panko breadcrumbs
- 1/3 cup freshly grated Parmesan cheese
- 1 teaspoon dried parsley and oregano
- Toppings:
- 1 cup marinara sauce
- 1 1/2 cups shredded mozzarella cheese
- Fresh parsley for garnish
Instructions
- Preheat oven to 425°F. Slice chicken breasts horizontally and pound to 1/2-inch thickness. Pat dry and season with salt and pepper.
- Prepare three shallow bowls with seasoned flour, frothy beaten eggs, and Panko-Parmesan-herb mixture.
- Dredge each chicken piece in flour, then egg, then breadcrumb mixture, pressing firmly to ensure full coverage.
- Heat oil in a large skillet over medium-high heat. Fry chicken 3-4 minutes per side until golden brown.
- Transfer to a wire rack to drain excess oil and maintain crispiness.
- Place chicken on a light-colored baking sheet. Top with marinara sauce and mozzarella cheese.
- Bake for 12 minutes until cheese is melted and bubbly. Broil for 60 seconds for extra browning if desired.
- Garnish with fresh parsley and serve immediately over pasta with garlic bread on the side.
Variations and Creative Twists
While the classic Chicken Parmesan is perfect as is, there are numerous ways to adapt and personalize the dish to suit different tastes or dietary preferences. These variations can add new dimensions of flavor and texture, keeping the dish exciting.
- **Spicy Kick:** Add a pinch of red pepper flakes to your marinara sauce or directly into the breading mixture for a subtle or pronounced heat. A dash of hot sauce in the egg wash can also provide an interesting zing.
- **Herb Variations:** Experiment with different dried or fresh herbs in your breading. Thyme, rosemary, or a blend of Italian herbs can offer unique aromatic profiles. Fresh basil leaves tucked under the mozzarella before baking add a burst of fresh flavor.
- **Cheese Combinations:** Beyond mozzarella and Parmesan, consider adding a layer of provolone for a sharper, tangier note, or a touch of smoked mozzarella for a deeper, more complex flavor. A blend of Italian cheeses can also be used.
- **Gluten-Free Option:** For those with gluten sensitivities, substitute regular all-purpose flour with a gluten-free all-purpose flour blend and Panko breadcrumbs with gluten-free Panko. The results can be just as crispy and delicious.
- **Baked Only (Healthier Option):** While pan-frying contributes significantly to crispness, you can opt for a healthier, baked-only version. After breading, lightly spray the chicken with cooking spray and bake at a slightly higher temperature (around 450°F or 230°C) for a longer duration, flipping halfway through, until golden and cooked through. This method will yield a less crispy crust but is a good alternative.
- **Air Fryer Chicken Parmesan:** For an even quicker and often crispier result with less oil, consider using an air fryer. Bread the chicken as usual, lightly spray with oil, and air fry at 375°F (190°C) for 12-15 minutes, flipping halfway, until golden and cooked through. Then top with sauce and cheese and air fry for a few more minutes until melted.
- **Mini Chicken Parmesan Sliders:** Cut the pounded chicken into smaller pieces before breading and frying. Serve these mini cutlets on slider buns with a dollop of marinara and a small slice of mozzarella for a fun appetizer or party food.
- **Chicken Parmesan Sandwich:** Place a full chicken cutlet on a crusty roll or ciabatta bread, top with extra marinara and melted cheese, and perhaps some sautéed peppers or onions for a hearty sandwich.
Storage and Reheating Instructions
Proper storage and reheating are key to enjoying your Chicken Parmesan leftovers while maintaining as much of its original quality as possible.
- **Storage:** Allow any leftover Chicken Parmesan to cool completely before transferring it to an airtight container. Refrigerate promptly within two hours of cooking. It will keep well in the refrigerator for up to three days.
- **Freezing:** Chicken Parmesan freezes remarkably well. For best results, freeze the cooked chicken cutlets (without sauce and cheese) individually on a baking sheet until solid. Then, transfer them to a freezer-safe bag or container, separating layers with parchment paper to prevent sticking. They can be frozen for up to three months. When ready to use, thaw overnight in the refrigerator.
- **Reheating (Oven Method):** To reheat, preheat your oven to 350°F (175°C). Place the chicken Parmesan on a baking sheet. If reheating with sauce and cheese, cover loosely with foil to prevent drying out. Bake for 20-25 minutes, or until heated through and the cheese is bubbly. For chicken that was frozen without sauce and cheese, add fresh marinara and mozzarella during the last 10-15 minutes of reheating.
- **Reheating (Air Fryer Method):** For a crispier reheat, place the chicken Parmesan in an air fryer basket. Air fry at 325°F (160°C) for 8-12 minutes, or until heated through and crispy. This method is excellent for reviving the breading’s crunch.
Conclusion
Creating the ultimate Crispy Chicken Parmesan at home is a rewarding culinary endeavor that combines simple ingredients with thoughtful techniques. From the careful pounding of the chicken to the precise three-stage breading process and the strategic two-step cooking method, each element plays a crucial role in achieving a dish that is both comforting and impressive. By following this comprehensive guide, you are now equipped with the knowledge to consistently produce a Chicken Parmesan that boasts a perfectly crispy crust, tender and juicy chicken, and a rich, flavorful topping of sauce and melted cheese. Whether served with pasta, garlic bread, or a fresh salad, this classic Italian-American dish is sure to become a cherished favorite in your recipe repertoire. Enjoy the process, savor the flavors, and delight in the satisfaction of a homemade masterpiece.
Hi, I’m Josie Erin. At TheRecipeBites, I turn simple ingredients into flavorful bites that make every meal memorable.